Balance Your Stride
By Liz Miller
To be a balanced skater in all senses of the word, you need to work on equalizing your balance and strength until you hardly notice the difference between either foot.
It doesn't take long for new skaters to discover that one foot seems weaker when striding. Every person has a dominant foot. If you have been right-handed all of your life, you probably (but not always) kick a ball with your right foot. Your left leg and foot provide the support and balance while your right leg gets stronger and more dominant at doing any active work -- for example, pushing to make a forward stride. Scooters and Half Swizzle drills are excellent for improving balance on one skate and the effectiveness of your push with the other.
 As you warm up at your favorite practice location, test your glide distance for each foot to determine your strongest support skate. Because most people are right-handed, the instructions below will improve the left skate’s weaker push and the right skate’s inferior balance. Simply reverse them if your strongest pushing skate is the left one. As you warm up at your favorite practice location, test your glide distance for each foot to determine your strongest support skate. Because most people are right-handed, the instructions below will improve the left skate’s weaker push and the right skate’s inferior balance. Simply reverse them if your strongest pushing skate is the left one.
Align Nose, Knee, Toes
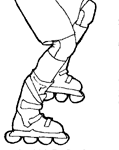
Before you tackle the drills, you must understand how to maintain upright wheels on the support skate by shifting your weight directly over that skate. This is commonly known as the Nose-Knee-Toes position. Start out on lawn if necessary to get a feel for it.
- Assume an A-frame stance, with feet a few inches wider than shoulder width.
- Place both hands on your left thigh above the knee pad and bend that knee. The right knee is now extended to the side as though you have just finished a stride or lunged to the right.
- Look down over the left knee and spot your toes, directly below the knee pad. This aligns your nose, right knee and toes vertically, which ensures the wheels remain upright rather than tilted. This is how you get full support coasting on the right skate while the left one does all the work.
Scooters on a Line
 Are you a one-sided pusher? This drill is the best way to even out your stride while building a foundation of balance and strength that benefits every type of skating you do. For best results, you need to find a bike trail with a painted center line, a sports facility with long painted lines or a parking lot with no traffic where you can chalk a line onto the pavement. Make sure your line is long enough to do at least 15-20 strokes. Are you a one-sided pusher? This drill is the best way to even out your stride while building a foundation of balance and strength that benefits every type of skating you do. For best results, you need to find a bike trail with a painted center line, a sports facility with long painted lines or a parking lot with no traffic where you can chalk a line onto the pavement. Make sure your line is long enough to do at least 15-20 strokes.
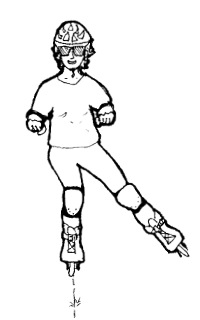
- Starting from the Ready Position, raise your hands to the imaginary handlebars of a scooter. Don’t worry about looking silly for long, this part is just until you get used to the drill!
- The imaginary scooter’s foot plate is only wide enough for your right skate. That is your cue to align Nose, Knee, Toes over the right. Remember to bend the right knee.
- With hands in handlebar position and eyes focused on the line ahead, push the left skate directly to the side, keeping all wheels in contact with the pavement. Recover the skate and push again and again, using the line as a spotter to help keep your body balanced and properly aligned.
- Right skate: The right knee remains bent at the same angle at all times. Focus on keeping head, shoulders and hips directly over the right skate so it never tips onto the inside wheel edges as you push with the left. The right skate’s wheels are tracing your line; so is your nose! Resist the urge to look down so you can do this by feel.
- Left skate: Focus on pushing with the back wheel until the left knee is straight, then keeping that skate close to the pavement as you bring it all the way back to center before starting a new push.
When you’re ready:
- Attempt to touch the inside of the left knee to the inside of the right knee just before set down.
- Place hands on hips or clasped behind your back in an aerodynamic tuck.
- Perform slow motion strokes.
- With the pushing skate held off the pavement at the end of a stroke (straight knee), glide on the balance skate for longer and longer distances.
Half Swizzles on a Line
If you have already mastered Swizzles, a shift of the weight to one side will allow you to perform motions similar to Scooters on a line, except your pushing skate's wheels never lose contact with the pavement. This drill continues your efforts to balance your stride while adding a heel carve. The heel carve is an advanced technique that can dramatically increase stroke efficiency and power.
- Starting from the Ready Position, raise your hands to the imaginary handlebars of a scooter.
- Align Nose, Knee, Toes over the scooter’s foot plate under your right skate. Remember to bend the right knee.
- With hands in handlebar position and eyes focused on the line ahead, push the left skate directly to the side, keeping all wheels in contact with the pavement.
- Near the end of your push, swizzle the left skate back toward your line rather than lifting it off the pavement. This results in extra pressure from the rear wheel as the skate carves an arc to return to center.
- Perform repeating half swizzles, using the line as a spotter to help keep your body balanced and properly aligned.
- Right skate: Same tips as above: maintain that bent knee and the Nose, Knee, Toes stance!
- Left skate: Focus on pushing with the back wheel. To achieve the return swizzle, your hip and ankle joints rotate slightly inward. Swizzle the left skate all the way back to center before starting a new push.
When you’re ready:
- Place hands on hips or clasped behind your back.
- Attempt to touch the inside of the left knee to the inside of the right knee before starting each new swizzle.
- At the moment of heel-carve, listen for the sound of wheel scrubbing pavement: that’s the sound of power!
Turn, Turn, Turn
 Remember to pay the same attention to your turning skills. Ever notice that a rink's skating direction is almost always counter-clockwise? The world is dominated by right-handed people with a dominant right foot which makes turning toward the left their preference. So my advice is to practice turning in your weak direction more often than your favorite until your skill and confidence even out. Remember to pay the same attention to your turning skills. Ever notice that a rink's skating direction is almost always counter-clockwise? The world is dominated by right-handed people with a dominant right foot which makes turning toward the left their preference. So my advice is to practice turning in your weak direction more often than your favorite until your skill and confidence even out.
|
Other August 2008 Stories
 Why Do I Fall Down? - We all take a tumble now and then. Knowing why means less crashing. Why Do I Fall Down? - We all take a tumble now and then. Knowing why means less crashing.
 Avoid Cheap Plastic Brake Pads - Cheap skates are bad enough. Brakes made of inferior materials are downright dangerous! Avoid Cheap Plastic Brake Pads - Cheap skates are bad enough. Brakes made of inferior materials are downright dangerous!
 Skates that Don't Roll Backwards - I told you they really work. Now I'm showing you by video! Skates that Don't Roll Backwards - I told you they really work. Now I'm showing you by video!
 Have Skates, Will Travel - Tips for carrying your skates to a summer destination, even as an airline carry-on. Have Skates, Will Travel - Tips for carrying your skates to a summer destination, even as an airline carry-on.
 Three's Company - Liz does the mileage for 3 or more, and tempts those willing to learn in Danville. Three's Company - Liz does the mileage for 3 or more, and tempts those willing to learn in Danville.
 Orbit Updates - Fresh perspectives on inline inventions and roller skis. Orbit Updates - Fresh perspectives on inline inventions and roller skis.
 Why Did You Spam Me? - Mourning the loss of the perfect email address; problems from changing. Why Did You Spam Me? - Mourning the loss of the perfect email address; problems from changing.
|